Hello dear readers -
First of all I would like to thank all of you for sticking with me even though my blog has been at a stand-still for nearly two months. At the beginning of August my husband was originally diagnosed with a rare cancerous tumor in his hand that was later found to be a rarer non-cancerous tumor, but because of the location and abmormal growth it resulted in the amputation of part of his hand. It has been a crazy, emotional roller coaster, and only recently have I gotten my sewing mojo back! (I did get a lot of reading done however, which I plan to blog about soon). Now that Shawn's recovery is going well I'm starting to get back into my normal sewing and blogging routine, and I have a LOT of catching up to do!
Ruth xX
27 September 2010
24 July 2010
Fall 2010 RTW update
It is so good to be back! I feel like I am in sewing and blogger withdrawl..I haven't done much of either lately and Shawn and I have more traveling planned so it may be awhile before I get back into my regular routine. The trip to Edinburgh was wonderful, although I am a bit disappointed that I didn't come away with any vintage finds. There are several great shops around the city, but Shawn's idea of a perfect day does not include digging though rooms filled with racks and stacks of vintage clothing (but he was a good sport scoping them out with me)..guess I'll have to plan another trip with like minded people!


Anyway, I caught up on my fashion reading, and wanted to share something interesting..retro is back on the runway (and we're talking full-on 50's and 60's retro here)! Fall 2010 is all about real, wearable clothing, and you can see it by the huge shift to lower hemlines and heels. No more crotch-skimming, abdomen crushing dresses or sky-high, foot fracturing heels..demure yet elegant, lady-like sensibility is (FINALLY) creeping in. This is probably best reflected in the Louis Vuitton collection, where just about every design has a retro 50's vibe:
LOVES IT!!
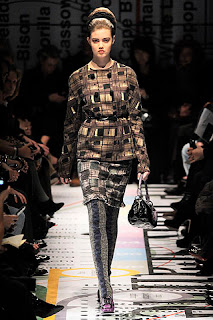
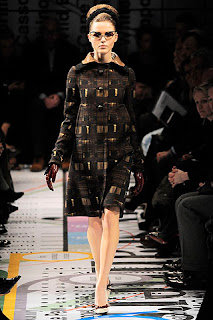
Lately Prada has been a bit too crazy for my taste, but this season they have gone back to what even Muiccia Prada calls "normal clothes". I'm definetly seeing 60's influence in this collection:
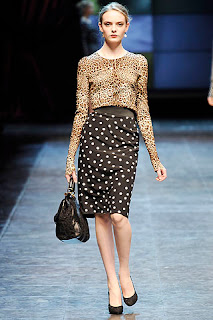
And don't count out Dolce & Gabbana..amid the hot pants and revealing sheers there are quite a few twin-sets and lengthy skirts:
If you're like me and love sewing these styles but aren't always sure how to rock them without looking "dated" or "frumpy," try making them in interesting prints and colors, or try using mixtures of luxe fabrics (ie wool and silk)..don't be afraid to mix textures, that is part of the fun! As far as accessorizing, I say just do what you like..that's what makes it unique! I personally feel you can't go wrong with a pair of killer heels (not necessarily high, but statement heels that may not always match) and some bold jewellery.
So get to it girls..this is our season to shine (and show why we've always known best)!!
View the full collections at style.com
18 July 2010
Hi everyone!
I just wanted to apologize for my long blogging hiatus - I have been working hard to finish my dress for the York races (which ended up getting cancelled, but that's another story to be told) and then Shawn booked an impromptu trip to Edinburgh for this week, so I have been sewing like crazy..I thought it would be perfect for a me-made holiday Zoe style, but unfortunately I didn't get as much made as I would have liked between work, a horrible bout of hay fever, and a very upsetting overlocking accident (which caused me to scrap the whole dress). It has been a very hectic and frustrating couple of weeks! I'm glad for a little break, but I can't wait to get sewing again! When I return I'll share my projects and hopefully some great vintage finds!
I just wanted to apologize for my long blogging hiatus - I have been working hard to finish my dress for the York races (which ended up getting cancelled, but that's another story to be told) and then Shawn booked an impromptu trip to Edinburgh for this week, so I have been sewing like crazy..I thought it would be perfect for a me-made holiday Zoe style, but unfortunately I didn't get as much made as I would have liked between work, a horrible bout of hay fever, and a very upsetting overlocking accident (which caused me to scrap the whole dress). It has been a very hectic and frustrating couple of weeks! I'm glad for a little break, but I can't wait to get sewing again! When I return I'll share my projects and hopefully some great vintage finds!
02 July 2010
Vintage Poppies Blouse
I know I was meant to post pictures on Tuesday, but I was mistakenly over-scheduled at work and ended up having to go in (grrrr)..and needless to say that didn't give much blogging time this week! So FINALLY here is my vintage blouse!


It is view A from this vintage Economy Design pattern:
The tie on the front is actually similar to a man's bow tie because it is simply tied around the neck, and the pieces that make up the "tails" are top-stitched on to the front opening. The pattern of this fabric makes it hard to see so here are some close-ups:
Overall this is a really simple blouse to make and could be done in a day or two. Although construction itself was simple, the directions were pretty basic and there were very few illustrations..I'm guessing this is why it's called an "economy" design. As shown in a previous post I altered the pattern from a 32, but it was still a bit snug so next time I will be a bit more generous with the fit. The pattern calls for armhole facings, but because this fabric is cream with dark flowers I decided to do a pin hem on the sleeve edges to avoid them showing though (and I think I like it better to be honest).
I really like this design but I'm not fond of how the bow detailing gets a little lost with patterned fabric. Next time I think I may use a contrasting color to make it stand out.
I've got an extra long weekend ahead so I'm hoping to get a few more patterns done..hope everyone has a great weekend, I'm off to get started!
28 June 2010
Getting A Great Collar
Let's face it..collars can be a pain in the @$$ not only to attach, but also to shape. I finished my vintage blouse today that has an attached collar, and thought some of you may like to see some tips and tricks. This particular collar isn't exactly the best to demonstrate with, but I supplemented with some examples.
I would say that one of the most important things to keep in mind when sewing a collar is what I consider to be one of the golden rules of sewing: reduce bulk whenever possible!
I would say that one of the most important things to keep in mind when sewing a collar is what I consider to be one of the golden rules of sewing: reduce bulk whenever possible!
Normally I use an overlocker on most unfinished seams, but collars are a rare exception for me. Honestly, it isn't really needed and it can end up leaving a little bulk or showing through the fabric (if it is light colored), especially in the corners.
I like to trim the seam allowance and then make overlapping "layers" so that the bulk is spread out:

Here you can see it incorporated on both edges on the inside:

Unlike this collar, many incorporate interfacing to give stiffness and sharpness. I follow the same concept, except I cut out as much of the interfacing in the seam allowance as possible because it is not going to affect the strength of the seam (this works for both sew-in and fusible interfacings):

Another prominent place to reduce bulk is at the shoulder seams. See all that shoulder seam allowance? No need for it!

So now that we've taken care of the sides, let's talk about corners. This probably isn't anything new to you, but the best way to reduce bulk at the corners is to cut across the seam allowance at an angle:

This seam could use more trimming, but when doing so cut carefully and conservatively. If you cut too close to the corner seam (or any seam really), it can pull apart when turning out.
Now that we've reduced some bulk, how do you get that elusive knife-edge?
 This can be quite difficult at times, especially when you can't press open the entire seam. This is a time where good pressing skills are essential, and unfortunately that really only comes with practice. There are however tools that can be incredibly useful for this, such as a tailor's ham or seam roll for curved seams, or a point presser & clapper for hard to reach areas. If you're in a bind or simply don't have one, never fear; the straight edge of a butter knife can work just as well (although it may take some more maneuvering).
Are you still with me? I know this is a long post, but it's almost over! Just one more thing I want to cover briefly: collar attachement.
This can often be the most frustrating part because sometimes you are attaching a straight piece of fabric to a curved edge (like this one).

As you can see from the photo above, the collar edge won't always lay perfectly against the neck edge. This is where ease becomes a huge factor in making it work. Unfortunately easing is another one of those things that comes with practice, so if you have trouble with easing don't give up!! The best way to success is to line up your notches, markings, and edges and pin them (vertically) in place, and then work from those points.
Almost done!! Now that the collar is in place, it's time once again for some good pressing. Press the seam up into the collar, and work out any wrinkles or bunching with your fingers and steam.
And there you have it..a flat, sharp, smooth , happy collar!

Although it's finished I want to wait and show it modeled..it really doesn't have a lot of hanger appeal. Pics tomorrow! :)
24 June 2010
Eye Candy
I didn't have any great vintage pattern finds this week, but I did come across this fun champagne brooch!

I bought it from a vintage store but I don't think it is "vintage" in the true sense..the finish and diamonte on it appears too new, so I'm guessing it is a modern retro piece. I'm not bothered though because I absolutely love it and think it will look great on a 50's evening jacket!
I quite like the idea of brooches..do any of you wear/collect them?
22 June 2010
Some Notes on Pattern Alterations
After a disappointing week of sewing, I did manage to get a project started this weekend..I figured it was time to get a vintage pattern in the mix so I started a simple 50's bow-tie blouse from this patern (view A):

This is a size 32 bust so I knew it was going to require some alterations to fit my 36" bust, but because all of the shaping darts are in the waist area I knew it wouldn't require a whole lot of fiddling. After making a toile of the pattern as it was, my hunch was in fact correct. So how to alter it? I saw on Friday that Gertie did a post about resizing vintage patterns, but as you can see from the picture below I didn't want to just add width to the side seams becuase the shape is so subtle that I didn't want to loose it..so that left only one alternative..slashing! Disclaimer: I'm not claiming to be a pattern cutting expert here, but I do have some knowledge and experience, so I'll show what worked for me.

This is a size 32 bust so I knew it was going to require some alterations to fit my 36" bust, but because all of the shaping darts are in the waist area I knew it wouldn't require a whole lot of fiddling. After making a toile of the pattern as it was, my hunch was in fact correct. So how to alter it? I saw on Friday that Gertie did a post about resizing vintage patterns, but as you can see from the picture below I didn't want to just add width to the side seams becuase the shape is so subtle that I didn't want to loose it..so that left only one alternative..slashing! Disclaimer: I'm not claiming to be a pattern cutting expert here, but I do have some knowledge and experience, so I'll show what worked for me.

This picture is of the front and back blouse pieces that I traced from the originals. The red lines indicate where I plan to slash the pattern. I made a horizontal slash in the bust area and the vertical line will be a slash to add width to the waist measurement. The original waist was fine but a bit too tight for my liking, so I decided to add just a bit so that I could feel comfortable wearing it with lower-waisted jeans if desired.
Here are the pieces after slashing. Front:
 and back:
It is probably hard to tell from the pictures what I did so I will explain as best I can!
This is typically a way to add to the bustline without adding to the waist or shoulder measurements. You make the slashes as shown, and then push the pattern outwards from the point where the 2 slashes almost meet. This makes the horizontal slash expand, which lengthens the side seams and keeps the shape in proportion with the expanding bust measurement. If you don't want to add to the wasit measurement, you simply match the slash up the bottom. If like me you want to add some width, simply spread at the bottom and set at the desired measurement. I did the horizontal slash at the underarm notch simply for reference, and made it 6cm long on both pieces. I made the vertical slash .5cm away from the end of the horizontal slash and checked to make sure it was not going through the waist darts. The vertical slash is essentially what is adding width to the bust as well as the waist. In order to do this without altering the shoulder, I cut the slash right up to the edge of the paper without actually cutting it apart. Then I adjusted the spread to add 0.8cm to the bust and 0.25 to the waist. This resulted in adding 3.2cm to the bustline and 1cm to the waist (explanation below). Note: Unless you are very confident in your skills, I recommend that you alter all pieces to the same measurements, otherwise they will not match up!
Next I traced new pattern pieces from the altered ones, and used those to cut out the fabric.
I admit that pattern cutting can be frustrating, but it is one of those things that will get easier with practice and experimentation. Don't give up if it doesn't always work, sometimes you have to go through several toiles before you get it right. And remember, a little goes a long way! Whatever measurement you add to the pattern you are really adding 4x that (left front, right front, left back, right back)..for example if you add 1cm to the wasit on the pattern you will have added 4cm to the garment (1cm x 4). Measure whenever possible, but sometimes you just have to guess (and that can often be the best way to learn)!
Subscribe to:
Comments (Atom)